This QR Code and Tracking System is developed locally by Syarikat Medsafe(BN) for Excelmed Sdn Bhd(MY).
Each QR Code is Unique and can only be used once
The QR Code and Serial number are laser etched onto each test kit and is tamper proof
Your test result can be registered without registering for an account on the site.
Step by Step Guide
Step 1
SCAN THE QR CODE
Scan the QR Code with your preffered App.
When prompted, open the link in your browser
Step 2
FILL IN YOUR DETAILS
A valid email address is recommended, (the digital certificate will be emailed to you)
Registering for an account has it’s benefits. (Click for more details)
Step 3
RECORD YOUR RESULT
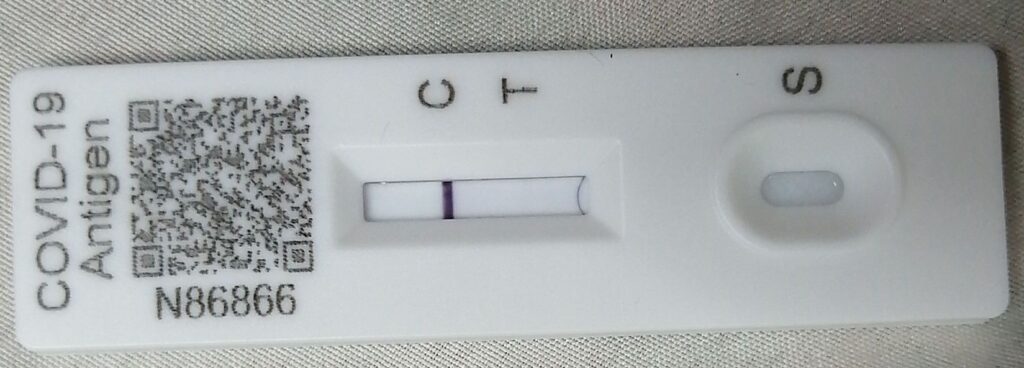
Record the time that the test was initiated,
After 15 minutes(for Nasal) or 30 minutes (for Saliva), enter the test result.
Tap “Select Files”, and you will be prompted to use the camera to take a picture.
Please ensure that the picture taken follows the example above
Step 4
VIEWING YOUR RESULT
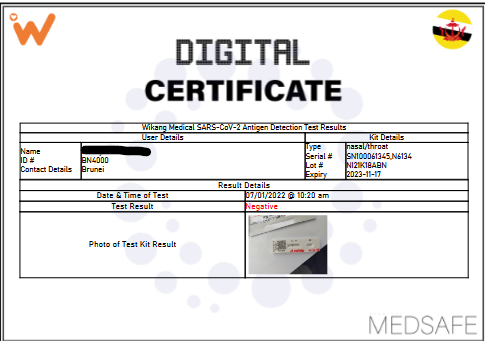
After submitting your result, you will then be given an option to download or view a PDF of your Digital Certificate.(Also emailed to you)
This Digital Certificate is also emailed to your email account.
For those who have registered, this test result is also available for viewing under “My Account”.
Benefits of Registering
Registering an account does give you the benefit of having all your Wikang Rapid Test Results in one convenient location.
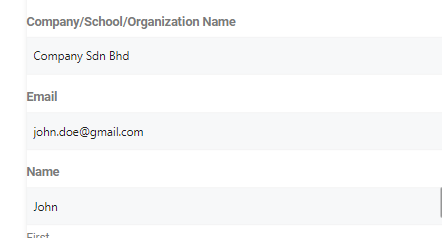
Registered users are automatically detected by the system and their user details will auto populate selected fields, saving you time and the task of entering your details each time.
Registration and Logging On is easy with Google Sign On
Companies, Schools and Organizations can have track all their staff/student/member results in one spot. Please contact us for more details.
How To Register?
Click here or on the Login Button on the top right of the screen.
Fill in your username, email address, Organization Name, Contact Number and ID Number, and click register.
An email address will be sent to you with instructions to confirm your email address and update your password. Please check your spam/junk folders if you do not see this email.
If you have a gmail or google account, tapping on “Login with Google” will automatically register you on the site.
Once you have registered and logged in with the Google Sign On button, you will be taken to the “My Account” control panel where you can update your user details under “Account Details”
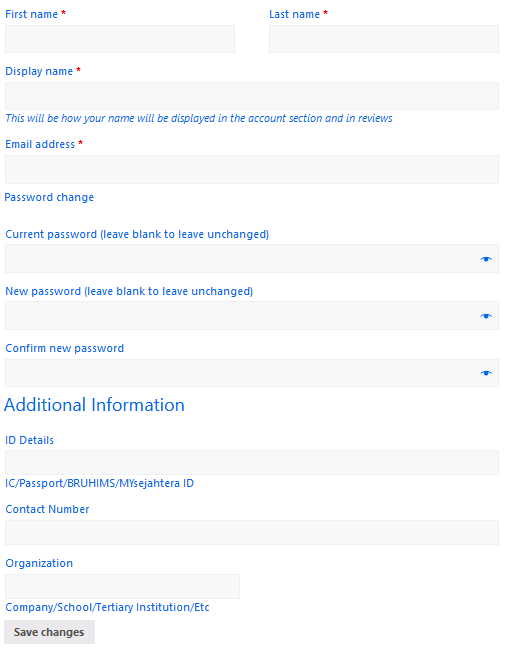
Account Details
User information added here will be used to generate your ART Result Digital Certificate.
Mandatory Fields are marked with the red asterisk (*)
Under Additional Information, there are 3 fields
ID Details – Enter your IC, Passport or BruHIMS Number here
Contact Number – Your mobile/home number
Organization – Enter your Company, School or Organization name here
These fields will auto populate when you are logged in, saving you the hassle of entering them with every new test.
Test Results
Your Test Results are available for your viewing by clicking on either of the buttons as shown under your My Account Control Panel.
The Most Recent Test Result will display your most test result on a single page.
The List View Page will display all your test results in a table format, sorted in chronoligal order.
Both views will display links to the relevant Digital Certificate for that test